- · Location
- · Production design
- · Studio/set design
- · Costume
- · Props
- · Ambient lighting
- · Artificial lighting
- · Key light
- · Backlight
Thursday, 27 November 2008
Mise-en-scene
How to set up for editing
- • Put cable in, turn camera to VCR
- • Connect camera in able to access programme, select Final Cut Pro (clapperboard icon).
- • File > log and capture to retrieve footage
- • Tab > click > video and audio
- • Name footage
- • Press capture
- • Press escape, and then turn camera on.
- • Click on title name of video
- • Press lift arrow to match on action frame by frame
- • Mark in (I)
- • Mark out(O)
- • Modify > make sub-clip, then name sub-clip
Key Consepts
Wednesday, 26 November 2008
26th November 2008- using final cut pro
Thursday, 20 November 2008
Match On Action And Overhead
Match on action:
A technique used in film editing, is a cut that connects two different views of the same action at the same moment in the movement. By carefully matching the movement across the two shots, film makers make it seem that the motion continues uninterrupted. For a real match on action, the action should begin in the first shot and end in the second shot.
Overhead:
This overhead diagram illustrates the camera positions for the two shots (the cameras are denoted by the bracketed numbers; the person is the lozenge on the left; the dashed line is the axis of action). When the person begins to stand up, we see the action from the vantage point of camera 1. When the person has stood up quite a bit, we see the action from camera 2.
Sony PD 170

The power switch has four positions….
- Press in the small green button and then rotate the power switch to VCR. The camera should bleep and the transport controls illuminate - you can use the player/recorder to review your tapes by operating the STOP, REWIND, PLAY, FAST FORWARD and PAUSE buttons.
- OFF (CHG) is obviously the power off position and used to save battery. You should also use this position when charging a battery.
- Press in the small green button and then rotate the power switch to CAMERA. You should now see a picture.
- MEMORY - select when recording information to the memory stick
NB -If you still cannot see a picture in the viewfinder check that you have removed the lens cap and then check that your battery has some charge in it.
INSERTING A TAPE
- Press the small blue EJECT button inwards and then slide downwards.
- Insert the tape
- First close the inner cassette compartment first where it says PUSH
- Finally close the outer cassette lid where it says PUSH
START / STOP - under the right thumb when the camera is hand held
This is a red button with the power switch control around it.
TO START RECORDING - Press the red button, the message REC will appear in the viewfinder
TO STOP RECORDING -Press the red button again, the message STBY will appear in the viewfinder.
NB when there is a tape in the camera it will automatically default to save mode after five minutes. You will still see a picture but it will take a few seconds longer to drop into record.
RECORDING STILL IMAGES
You may have to record still images for download onto a web page.
- Press the silver PHOTO button (beside the zoom rocker) firmly. The camera will "blink" and record the still for seven seconds. Seven red markers will countdown the recording.
- Pictures can also be recorded on a memory stick inserted into the camera.
POWER ZOOM
- The 'T' stands for TELEPHOTO and will zoom the lens in.
- The 'W' stands for WIDE-ANGLE and will zoom the lens out.
Press the zoom controller gently for a slow zoom speed and press harder for a faster zoom speed.
There is also a manual zoom ring (behind the focus ring) The zoom speed is controlled by the speed at which the ring is turned. Turn clockwise to zoom out and anticlockwise to zoom in.
AUTO LOCK
- When the HOLD/AUTO LOCK switch is in AUTO LOCK position - the camcorder will automatically adjust the IRIS, GAIN, SHUTTER SPEED and WHITE BALANCE.
- With the HOLD/AUTO LOCK turned to the middle position you have the choice of operating the above features manually or on auto
- To retain the settings you have adjusted manually, turn the HOLD/AUTO LOCK to the HOLD position.
AUTO FOCUS
- With the FOCUS switch set to AUTO the camera will automatically focus for you.
- Set the switch to MANUAL to take control of focusing and appears in the viewfinder.
- The PUSH AUTO button below will automatically focus the camera on whatever is in the centre of the picture. When you release the button it will revert to the manual mode.
STEADY SHOT
- This is an optical means of compensating for camera shake.
- You can switch it on/off with the STEADY SHOT in the menus.
- When switched off - the off symbol appears in the viewfinder/LCD
- It should be switched on in most circumstances because even lightweight tripods are inherently unstable.
EDIT SEARCH
- Momentarily holding down the EDIT SEARCH rocker marked "-" allows you to look at the last two seconds of the last picture you recorded.
- By holding down the "+" or "-" side of the edit search you can forward or rewind through the tape.
Be careful when you use the edit search facility. If you forward onto blank tape and start recording, there will be a break in time code - which will give you problems when you come to edit. Always cue up on the last recorded picture to ensure you have continuous timecode throughout your rushes. The END SEARCH function will help you do this…
The END SEARCH button will take you to the end of the last recorded section. The camera rewinds or fast forwards the tape until it finds the last picture frame - it will play the last five seconds of your pictures and park, ready to record.
THE LCD SCREEN
- Once you pull out the LCD screen the viewfinder is automatically switched off.
- However, both the Viewfinder and LCD will be on together when the screen is turned through 180 degrees
- Once the LCD screen is re-housed into the side of the camera the viewfinder becomes operational.
- When the screen is turned through 180 degrees (to do a piece to camera) it drops into "mirror mode".
- From that screen position you can also push the screen flat against the camera – with the screen facing outwards. This may be useful when conducting an interview with the camera on a tripod.
- You can adjust the brightness of the screen by using the LCD BRIGHT +/- controls on the left hand edge of the screen.
- You can also adjust the cameras backlight brightness in the menus
NB in mirror mode a small cartoon face appears in the viewfinder (cute!).
Take care of the LCD screen….
- Do not touch the surface of the screen
- Do not lift the camera by the viewfinder or screen
- Remember the LCD screen uses more battery power than the viewfinder. Revert to viewfinder only use, if battery power is running out.
- Exposing the screen to sunlight for extended periods will damage it.

Shot Size


In the closeup shot, a certain feature or part of the subject takes up most of the frame. A close up of a person usually means a close up of their face (unless specified otherwise).
Close-ups are obviously useful for showing detail and can also be used as a cut in.
A close-up of a person emphasizes their emotional state. Whereas a mid shot or wide shot is more appropriate for delivering facts and general information, a close-up exaggerates facial expressions which convey emotion. The viewer is drawn into the subject's personal space and shares their feelings.

Shot Reverse Shot
Shot reverse shot (or shot/counter shot) is a film technique where in one character is shown looking (often off-screen) at another character, and then the other character is shown looking "back" at the first character. Since the characters are shown facing in opposite directions, the viewer assumes that they are looking at each other.
Shot reverse shot is a feature of the "classical" Hollywood style of continunity editing, which deemphasizes transitions between shots such that the audience perceives one continuous action that develops linearly, chronologically, and logically.

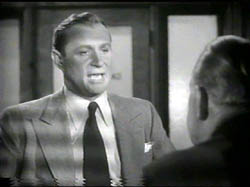
This is an example of shot reverse shot.
Rule Of Thirds
The rule states that an image should be imagined as divided into nine equal parts by two equally-spaced horizontal lines and two equally-spaced vertical lines, and that important compositional elements should be placed along these lines or their intersections. Proponents of this technique claim that aligning an image with these points creates more tension, energy and interest in the photo than simply centering the feature would.

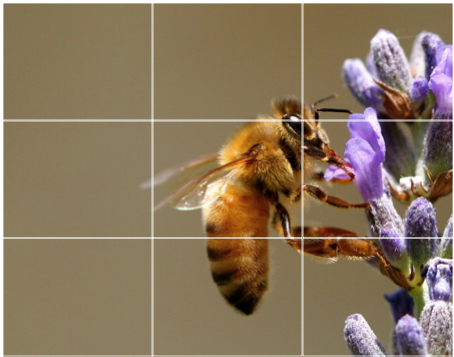
The rule of thirds can be applied by lining up subjects with the guiding lines, placing the horizon on the top or bottom line instead of the center, or allowing linear features in the photograph to flow from section to section. In addition, many photographers recommend treating any "rule" of composition as more of a guideline, since pleasing photographs can often be made while ignoring one or more such rules.
Wednesday, 19 November 2008
180 degree rule

Of what I understand of the 180 degree rule is that it is also referred to `the line of action.
An example of this is: If Bob is on the left and Dave on the right, then Bob should be facing right at all times even if Dave is in the corner of the frame, Dave should be facing left at all times if even if Bob is in the corner of the frame. If the camera goes past 180 degrees and is on the other side of the characters it will look like Bob is on right facing the left and Dave is on the left facing the right when it shouldn't be like this. You can only brake the 180 degree rule if you are trying to do special effects.
For a better example I got this example from Wikapedia:
The 180° rule is a basic film editing guideline that states that two characters (or other elements) in the same scene should always have the same left/right relationship to each other. If the camera passes over the imaginary axis connecting the two subjects, it is called crossing the line.
Research

- The three cars
- Motor bike
- Johnny English's watch
- A button to release their Aston Martin from the truck
- Speeding camera
- Suites
- smart trousers
- Long sleeve T-shirts
- Gun pouch

Camera shots: medium long shot panning
Colours: film shot in daytime with dark filter (slight shadows of houses can be seen in some scenes) costumes are dark
Costumes: ninja and peasant clothes (mainly dark colours used)
Props: weapons and household objects (chairs bowls beds ect)
Sound effects: buning wood and punching noises used frequently
General sound: some background music to add tension as well as poor dubbing effects (though due to darkness this is not very obvious at this point in the film)
Setting: Chinese village in 1700s (architecture of huts and a well with bamboo used frequently)